 So, this is long overdue. But now you can follow my on Facebook and get regular updates on my blog through everyone's favorite social network! Just click here: http://www.facebook.com/MeAndMyLaptop
1 Comment
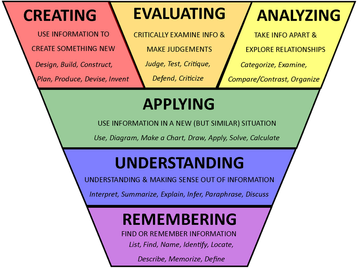
 "Lifeless Face #045" by nottsexminer Do you see a face? Look again at the picture on the left. Look very closely. Now do you see a face? Recently, while perusing the gift shop in my local art museum, I discovered a create collection of photography in a book called Found Faces. Immediately, I thought "This is the result of very careful noticings and creativity! This is what I want my students to do!" Of course, the book came with a $15 price tag, which I did not have in my budget that day, so I was more than a little disappointed that I'd have to go home empty handed. My next thought (which quickly followed by my initial excitement and the subsequent sadness due to lack of funds) was to purchase the book used on Amazon. (The current price starts at only $4.86 as I'm posting this.) I was really happy to find out it was cheaper online, but my happiness did not stop there... A quick Google search revealed that there is an entire collection of these "found faces" on Flickr containing literally thousands of images similar to the photo above. Now, before you go copying photos and pasting them into Power Point presentations--or photocopying them by the thousands--do be aware that each photo in the collection has its own license terms; some have "all rights reserved," while others have only ask that you give credit to the photographer or that you do not use the photo for commercial purposes. Before you "borrow" a photograph, be familiar with its license terms and know what those terms mean. So, how can "found faces" be used in the classroom? First, I love the idea that these photos are great examples of finding the extraordinary in ordinary places, and of really approaching the everyday with a careful, watchful eye. How many times a day do we walk past a hidden face without ever seeing it? It would be a great exercise in observation to have students locate their own found faces in their schools, homes, or communities. Additionally, I see huge potential in terms of narrative writing and descriptive writing in response to these faces. I think students would enjoy viewing some of these faces and writing their background stories. This would also be a great anchor activity, or a springboard for even richer narrative and descriptive writing experiences.  Click image to enlarge To the left, you will see a simplified version of Bloom's Taxonomy, one that I intend to use with my students during the upcoming school year. I wanted a visual that had an inverted-pyramid shape because the standard pyramid shape (with higher order thinking skills on top) seems to suggest that "creating" gets the least amount of attention, with more time given to more basic skills, such as remembering and understanding. I wanted to make sure that my visual aid did not suggest this; if anything, this chart might suggest that lower order thinking skills deserve less class time. I wanted something that grouped higher order thinking skills (the top level, shown in warm tones) and lower order thinking skills (the lower levels, shown in cool tones). I also wanted a chart that clearly explains what each level means. For example, what does it mean to "analyze" something? Finally, I wanted a visual that took out the bulk of the verbs that my freshmen won't be familiar with. It's not that I don't think my students should learn what it means to "scrutinize" or "assess." But, I've noticed that, in several of variations on the Bloom's pyramid, many of the verbs are simply synonyms for each other. Additionally, providing a chart stuffed full of terminology can be very off-putting for some of my students, particularly my struggling learners. Instead, I plan to hand out this visual to my students, with the intention of adding new verbs to the chart as students encounter them in their reading. Click on the above image for a larger view. And, if you like my chart, please feel free to copy, print, tweet, or distribute it. Heck, put it on T-shirts if it makes you happy. To see my earlier post on Bloom's Taxonomy, click HERE.
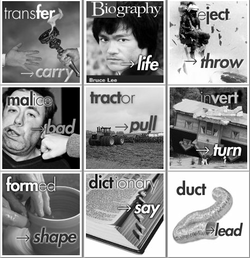
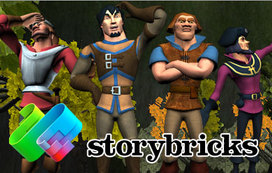
 Recently, I discovered a vocabulary website called Membean. The site offers personalized vocabulary lessons to help with preparation for the SAT, the GRE, or general vocabulary improvement for both individuals and schools. The vocabulary lessons are visually stunning and very interactive; however, they are not free. Personally, I know that my school simply cannot afford to pay for tailored vocabulary development for each student, but Membean's format has given me the idea of setting up a vocabulary wiki and having my students create their own interactive vocabulary pages, including definitions, pictures, videos, sentences with context clues, etc. If your school has money to spend, by all means, it appears to be well worth the money, but I know for some of us, spending even a penny more isn't an option. With that said, let me tell you what Membean has for free. (Doesn't the word "free" have a beautiful ring to it?) Membean has a wonderful collection of podcasts featuring different root words. (Thanks, Membean!) I plan to use a study in roots, prefixes, and suffixes as an integral part of my vocabulary curriculum this upcoming school year. In fact, I plan to use Membean's podcasts as a bellringer activity in my classroom by having students make note cards to record the meaning of each root word. I'll have students record the root, its meaning, and definitions of multiple words based on that root; they will also draw an illustration to accompany the root word. Students will be given an online pretest to assess prior knowledge, and will be retested throughout the school year to measure to assess growth. Below, I am sharing the template that my students will use to create the note cards. As always, feel free to copy/print/distribute. Word Root of the Week View more PowerPoint from jesspilgreen  A few weeks ago, I saw a post on an educational blog (probably Free Tech 4 Teachers) about StoryBricks, an online program that allows users to create their own MMOs. If you are a gamer--or, in my case, married to one--then you already know what an MMO is. If not, then allow me to explain: an MMO is a Massive Multiplayer Online game. Basically, it is a game played online by multiple players at once; the players' characters are able to interact with one another to make the story really come to life. Think World of Warcraft or Guild Wars. Now, I might not be the die-hard gamer that several of my friends and family members are (yes, even my mom is a gamer) but this definitely caught my attention! With the buzz around gaming in education, and the push for increased computer science (STEM) in schools, I was curious to check out this new option. One of the most intriguing aspects of StoryBricks is that users don't simply play the game; they build the game using basic concept of computer programming. Once I signed in and began playing around, the interface really reminded me of Scratch. Scratch is a "computer programming language learning environment" created by MIT, which has been used in schools to introduce youngsters to the concepts behind computer programming. StoryBricks, on the other hand, seems to be aimed at an older demographic. I predict that this will be used mostly in middle school and high school classrooms. As many students in this age group are already playing MMOs, introducing the complexities of computer programming through this format is sure to spark some students' interests. I'm not a computer science teacher, so my first thought was "That's great, but how can I use this in my English classroom?" The first idea that came to mind was using StoryBricks as a digital storytelling tool; I could have students create their own interactive myths or legends. I also notice that the commands that are used to build the stories really enforce logical thinking (if-then statements, for example). I also thought about the revision process that students would undergo in order to get their stories to turn out well. In short, there are many reasons why StoryBrick would make a good edition to the English classroom. If nothing else, pose it as a challenge to the uninterested student who hates homework but loves computers; have him* work on a story during his "free time" and see where it takes him. Below, I have embedded a brief screenshot of myself experimenting with StoryBricks. It's best viewed if you imagine some incredibly suspenseful, adventurous music as you watch... *or her, because computer superstars come in all shapes and sizes  For this upcoming school year, I intend to make the jump from using Microsoft Word to using Google Docs. Why? Because students can start their work at school and finish at home (or vice versa). Because I don't have to worry about compatibility issues with students owning different versions of software. Because it saves automatically, so students can't blame the computers for losing their work. Because it's free, and I hope students will continue to use it long after my class. And because it's paperless, so I don't have to worry about low toner, paper jams, or any other of the countless problems that become part of my computer lab existence. I'm preparing a handout for my students to keep in their writing binders, showing them exactly what expect when it comes to formatting their papers (header, footer, margins, etc.) Why? Because if they have a tool to help them through the technical aspects, then I can focus on helping them with their writing. Please feel free to download/print/share the document below. A screencast will be coming soon... After discovering ImageSpike yesterday, I started wondering how its use could be expanded across disciplines: social studies, science, math, etc. It dawned on me that IamgeSpike would be an exceptional tool for language studies. namely, it could be used to construct maps, charts, or other visuals that incorporate vocabulary study. I imagine having Spanish students work with technology to create a "spiked" image, labeling items in an image in Spanish (see image below). These images could then become student study tools for review and practice. The same concept could be applied to anything that can be labelled: the names of states, the parts of a cell... you could even create an image of math problems and then "spike" in the answers. ImageSpike is quickly becoming one of my favorite tools for the upcoming school year. Also, I failed to mention in my last post that ImageSpike gives you embed code to post on your own website/blog/e-portfolio.   I recently discovered ImageSpike after reading about it on the Free Technology for Teachers blog, and I can see endless possibilities with this tool! This would be a wonderful way to make my images more interactive. According to the website, ImageSpike allows users to "mark up" photos with "interactive hotspots." This sounds confusing at first, but it's easy to understand the concept once you see a "spiked" image. It's also very easy to create one. To spike an image, first upload a picture from your PC or supply the URL address. Next, click on areas of the picture to create "hot spots." Hot spots are dots that appear on your image. When you hover over the dot, a link appears. You can link these hot spots to videos, web pages, images, etc. Again, just supply the URL for the content you want to link to the hot spot. It's multimedia on steroids. Below is my first ever "spiked" image--a photo of Bernini's The Rape of Proserpina. This shows how I would use ImageSpike in my own classroom: to link resources to an image, keeping my information organized and visually stimulating. I could also see having students create images loaded with their own hot spots; this could take place of a standard poster board presentation, or could be used as part of a student presentation. I could also have students visit a "spiked" image (similar to the image below) and then take notes or answer questions related to the media that students are directed to. This would also work great with maps; I already have plans to create a spiked image of the journey of Odysseus to use this upcoming school year. How will you use ImageSpike?   It's May 12, and I'm in the final stretch; only three more work days until summer break. So, what I would like to do is ask for requests from blog visitors. What should I research and report about next? Is anyone in need of a good print-ready tutorial? What would you like for me to look into next? Please leave suggests as a comment to this blog post, and I will choose some suggestions for upcoming topics. Happy summer, and--if you are also a teacher--enjoy your well-deserved break! |
AuthorDr. Jessica Pilgreen, Ed.D. Archives
December 2020
Categories
All
|

