ME AND MY LAPTOP
  • My Blog
  • About Me

Beowulf Has Defeated the Monster... and We Have Proof!

  
Grendel’s Arm Part 1: Making the Form
View more PowerPoint from jesspilgreen


Making the Basic Form

What You Will Need:
  • Toilet paper
  • Masking Tape and/or Duct Tape (I used both)
  • 1 Pair of Scissors
  • 1 Student Who Would Rather Get His Arm Taped Than Sit in Study Hall

For the basic form, I found a willing volunteer to have his arm wrapped in toilet paper, then wrapped in masking tape, and then wrapped in duct tape.  I had two very careful students wrap his arm for me.  Then, they cut the tape form of his arm off like a cast.  Next, I stuffed the empty form with more T.P. and taped it shut.  I also rolled up some small pieces of duct tape and taped those to the tops of the hands to look like finger bones.  I also made the fingers longer.  This took about an hour to complete.

Time to Play with Paper Mache

Supplies:
  • Paper Towels (no pattern preferred)
  • Glue (in a bottle, not a stick)
  • Water & a Cheap Container (cup) 
Once you have the basic form constructed, it's time to add some bulk and details with paper mache.  There are several paper mache "recipes" out there, but my favorite method is a roll of Viva paper towels (I prefer Viva because they don't have any sort of pattern on them) and a glue-water mixture.  My water-glue ratio varies depending on how stubborn the paper mache is being (more glue, obviously, makes it stickier).  Also, if the mache isn't hanging on the way I want it to, I will apply a layer of glue directly to the area that I'm sculpting and let it dry.  I start by cutting my paper towels into long strips to make them easier to work with; the long thin strips also made it easier to mimic the appearance of muscle tissue, which I added for visual interest and a not-too-intense gore factor.  I used larger, flat pieces of paper towel to mimic layers of skin.  (One tip that I have learned from working with paper towels is that if you rip or fray the edges of the paper towel, the strips blend much more seamlessly, making it harder to tell where one piece of paper towel ends and another begins.)  You can also use full-sized pieces of paper towel and paint the water-glue mixture on, rubbing as you go, to create the effect of wrinkles.  (I used this technique a lot on my previous Sorting Hat project.)
Grendel’s Arm Part 2: Paper Mache
View more PowerPoint from jesspilgreen

Grendel’s Arm 3: Painting
View more PowerPoint from jesspilgreen
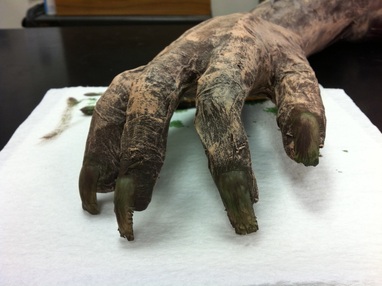

Time to Paint!

Once my paper mache arm was completely dry, I covered the entire form with Plaid brand Dark Umber acrylic paint that I picked up from Wal-mart.  I had some laying around from a previous project, so I put what was left to good use.  Then, I painted the veins an eye-popping blue before dry-brushing the entire arm with skin tone colored paint (again, I used Plaid brand).  I also dry-brushed over the muscle tissue areas of the arm with a dark red paint (it was a bright red that I darkened with just a touch of black paint).  The combination of the dark red with the brown underneath really came out better than I had expected!  Also, the bright blue of the veins looked really good after it was covered with skin tone paint; it looked just blue enough to be believable.

Fingernails & More Details

I decided that Grendel needed claws, so I bought a box of acrylic nail tips and distressed them with a pair of tweezers and a nail file.  I tried soaking the nails in coffee, but that didn't change the color enough.  Instead, I mixed some Burnt Umber paint (left over from the arm's base coat) with a lot of water and painted the nails to give them a creepy, dirty, worn-out look, as though he had been scratching away in his muddy lair.  The paint was watered down enough so that it didn't create an opaque finish on the nails; it just stuck in all of the cracks and grooves of the nail and stained them a yucky brown--very effective!

I am still working on the final touches of my masterpiece but, in the meantime, here is a close-up of Grendel's claw...
Picture
Powered by Create your own unique website with customizable templates.
  • My Blog
  • About Me